
Almond Nail Designs: 14 Looks You Can Wear
Explore almond nail designs for every skin tone, length, and outfit, with tips on choosing, applying, and keeping the shape neat between fills.
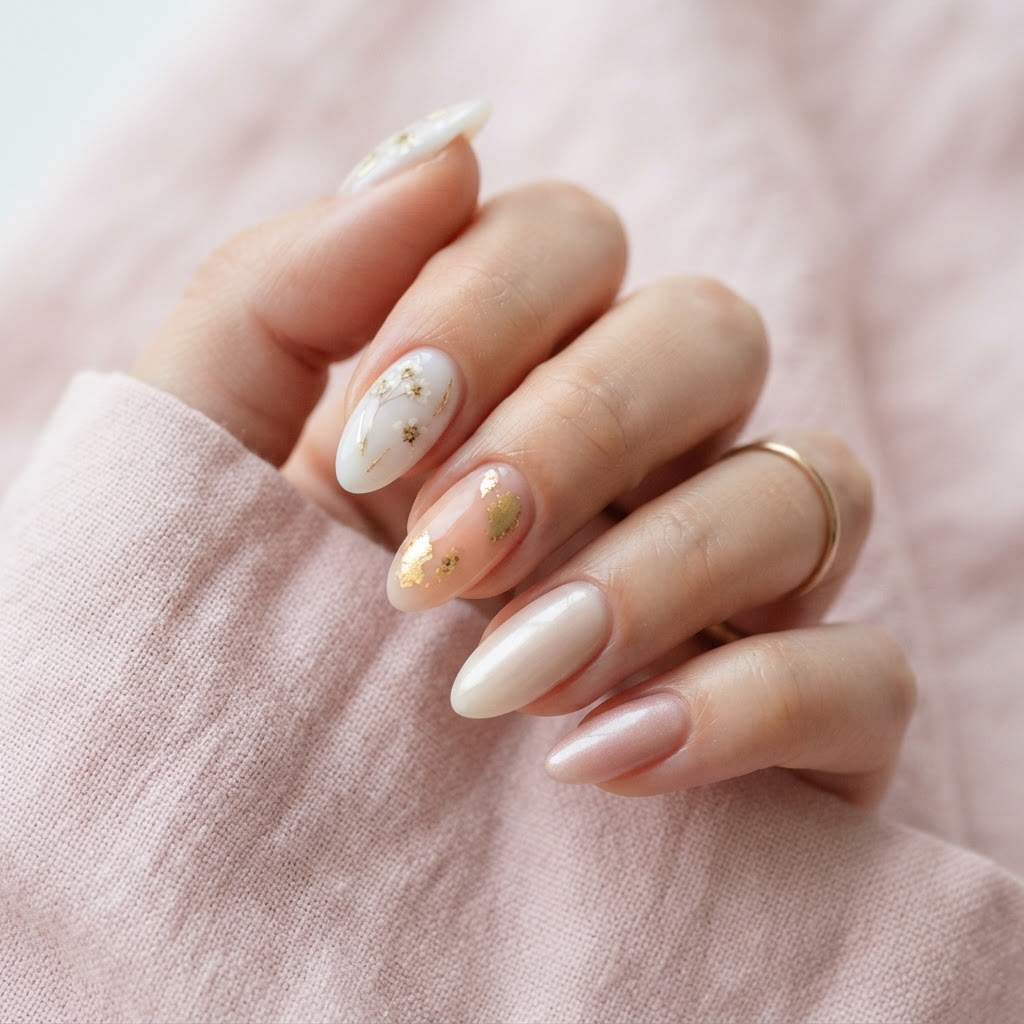
Almond nail designs are easy to search for and hard to narrow down, because the shape flatters almost every hand without demanding a specific nail length. The sides taper in from the cuticle and meet in a rounded point, so fingers look longer and the cuticle area looks neater, even on shorter beds. That's the main reason this shape keeps showing up in salons and in people's own kits.
If you came here for ideas you can actually wear, you'll find more than a dozen below, sorted by how hard each one is to do yourself. Some take two coats of polish and a top coat. Others need a steady hand or a trip to a tech.
After the list, you'll find help picking between looks based on your skin tone, outfit, and how long you need the set to last, plus how to keep the almond point from growing out square between fills. The almond style guide has more on filing angles if you want the shape itself explained first.
Almond Nail Designs to Try
Classic French Almond
Soft white tips over a clear or sheer pink base, finished glossy. Works best on medium to long almond nails where the tip has enough room to curve. Easy to do at home with striping tape or a french tip guide sticker. Curve the tip line to match the nail's point instead of making it straight across.
Milky White Almond
Milky white polish, slightly sheer, in a glossy or soft matte finish. Suits short to medium almond nails and works on natural nails too. Beginner friendly since one or two even coats is all it takes. Wipe your brush on the bottle neck before each coat so it doesn't pool near the cuticle.
Soft Chrome Almond
Pearl or silver chrome powder over a nude or white base, mirror finish. Best on medium to long almond tips since the shine reads better with more surface area. Moderate difficulty at home; needs a chrome powder and a gel base. Apply the powder with a silicone tool, not your finger, for an even mirror.
Micro French Tips
A thin white or colored line along the very tip, over a clear base. Suits short and medium almond nails, especially if you want length without much free edge. Easy once you have a fine brush or striping tape. Use a liner brush, not your regular polish brush, for a thin even line.
Negative Space Almond
Clear gaps left in the design paired with one solid color, usually glossy. Works on medium to long almond nails where the point gives the clear space somewhere to go. Medium difficulty; needs a steady hand or a small dotting tool. Seal the clear part with top coat too, not just the polished part, so it doesn't catch and peel.
Solid Cream Almond
One flat cream color, no shimmer, soft matte or glossy. Suits any length, especially short and medium almond shapes for everyday wear. The easiest look on this list; two coats and a top coat. Pick a cream shade close to your skin tone if you want your fingers to look longer.
Glazed Shimmer Almond
Sheer iridescent powder or a shimmer top coat over a nude or white base. Best on medium to long almond nails so the light catches along the curve. Medium difficulty; the powder needs a tacky top coat to grip. Apply in a well-lit room so you can see where the shimmer has settled unevenly.
Gold Foil Accent Almond
A nude or soft pink base with a few pieces of gold foil pressed near the cuticle or tip. Suits medium almond nails and works well as one or two accent nails rather than a full set. Medium difficulty because foil needs a special glue or gel to stick. Press the foil on with a makeup sponge instead of your finger for a cleaner transfer.
Dark Chocolate Almond
Deep brown polish in a glossy finish, sometimes with a thin gold line at the base. Suits medium to long almond nails and reads richer the longer the shape. Easy to medium; dark colors show brush strokes more, so thin coats matter. Apply three thin coats instead of two thick ones to avoid streaks.
Pastel Ombre Almond
Two pastel shades blended from base to tip, usually with a makeup sponge, finished glossy. Works on medium to long almond nails where there's enough length to show the gradient. Medium difficulty at home; it takes a little practice with the sponge. Let the first color dry fully before sponging the second, or the shades will muddy together.
Minimal Line Art Almond
A clear or nude base with one or two thin black or white lines, matte or glossy. Suits short to medium almond nails for a quiet, grown-up look. Medium difficulty; needs a fine liner brush or a nail art pen. Practice the line on paper first so your hand knows the motion before you commit to the nail.
Classic Red Almond
Solid red in a glossy finish, with no other color added. Suits any almond length and holds up well for formal events. Easy; red is opaque in two coats on most formulas. Clean up the edges with a small brush dipped in remover for crisp lines.
Micro Floral Almond
Tiny hand-painted or pre-made flower decals on a nude or white base, sealed with glossy top coat. Suits medium to long almond nails, usually as an accent on one or two fingers. Harder to do freehand at home; decals make it much easier. Seal decals under two coats of top coat so the edges don't lift.
Smoky Almond
Join the newsletter
Get fresh nail tutorials, trends, and business tips straight to your inbox.
Blended gray and black polish in a soft matte or glossy finish, with no hard edges. Suits medium to long almond nails for a moody, low-maintenance look. Medium difficulty; blending while the polish is still wet takes a light hand. Work on one nail at a time so the polish doesn't dry before you blend it.
How to Choose the Right Almond Look for You
The look you pick depends on more than taste. These four things matter most:
If you're stuck between two looks, think about your week ahead. A quiet week calls for something low maintenance like solid cream or milky white. A week with plans calls for whatever catches your eye in the list above.
Mistakes to Avoid With Almond Nails
Adapting Any Look for Polish, Gel or Press-Ons
Every look above can move between formats with small adjustments.
Whatever format you choose, the almond shape itself is usually pre-set on press-ons, so pick a pack labeled almond rather than filing a different shape down afterward.
Getting the Look
At home, these designs come together in a predictable order:
At the salon, describe the shape and finish clearly. Try saying: "I'd like almond-shaped nails, medium length, with a [color] base and a glossy top coat," or name the specific look, like "a milky white almond set" or "soft chrome on an almond shape." Bring a photo if you have one; it's the fastest way to avoid miscommunication.
Between fills, the almond point is the first part of the shape to change as the nail grows out, since new growth pushes the taper toward square. Ask your tech to re-taper the sides at every fill rather than just filing the tip, and if you're doing it yourself, file the sides in small strokes every one to two weeks instead of waiting until the shape is noticeably off.
See These Looks on NailRush Live
The almond style guide is the best place to start if you want more detail on the shape itself, including filing angles and length comparisons you can use for any of these looks.
If you want to preview a look on your own hands before committing, open the AI Nail Design Studio. Pick almond as your shape, set a length and occasion, then add the colors or finish from any design above, or upload a reference photo. The studio generates a realistic design along with its color list, techniques, and tips, and you can remix it, save it to your library, or share it to the community gallery.
Frequently Asked Questions
What is the best nail length for almond nails?
Medium length shows off the almond point without being hard to manage day to day. Short almond nails work fine too, especially for solid colors or micro french tips, but very long lengths need more upkeep to keep the taper from snagging.
Do almond nails suit every hand shape?
Almond nails flatter most hand shapes because the tapered point visually lengthens the finger. Shorter fingers especially benefit from the elongating effect. The main exception is a very short or narrow nail bed, where a long point can look out of proportion.
How long do almond-shaped nails last before needing a fill?
Most sets need a fill in two to three weeks, depending on how fast your natural nails grow. Gel and acrylic almond sets hold their shape longer than regular polish, which tends to chip at the tip sooner.
Can short natural nails work with almond designs?
Yes. Solid colors, milky white, and micro french tips all work well on short almond nails. Avoid designs that need a lot of surface space, like ombre or floral accents, since they look cramped on a shorter free edge.
What file shape works best for almond nails?
A fine-grit file used at a slight angle on each side, tapering toward the center, creates the almond shape. Round off the very tip last so it isn't a sharp point.
How do I stop almond nails from turning square as they grow out?
Re-taper the sides every one to two weeks instead of only filing the tip. Ask your tech to reshape the sides at every fill appointment so the point doesn't disappear.
Are almond nails hard to maintain?
Not especially, though the pointed tip is more prone to catching on fabric or hair than a square shape. Keeping the length moderate and the tip slightly rounded instead of sharp reduces breakage.
Join the newsletter
Get fresh nail tutorials, trends, and business tips straight to your inbox.
